I’ve had countless moments that demanded to be captured. And there’s nothing more disheartening than actually capturing that moment, only to discover it was too dark or too bright, or too…anything. When you’re quickly pulling out that camera and snapping away, it’s all too easy to skip a few steps in setting up your image. And frankly, the best moments in life are spontaneous. They won’t wait for you to adjust your camera dials to the perfect setting. Sometimes you just have to act quickly, and hope that things turn out well. Sometimes they do. And sometimes, they don’t.
With your standard point and shoot, you often won’t have to deal with this problem. Most point and shoots these days are calibrated to account for any shooting situation. They’ll automatically trigger the flash, or adjust their ISO, shutter speed, and aperture settings. That is definitely a luxury, and a benefit of shooting with that type of camera. But if you’re testing the waters with your fancy brand new DSLR (or even if you’ve been shooting with it for a while), it’s a lot easier to end an evening of picture-taking with a whole roll of incorrectly exposed pictures – especially if you’re trying out your manual settings. It’s very easy to be discouraged by this. But let me tell you something: Don’t be.
Don’t be discouraged that your picture didn’t turn out quite as expected. It happens all the time, even to the best of us. And the reassuring thing is…your crappy photo isn’t dead just yet. It just needs a little post-production.
One thing any beginning photographer should keep in mind is that a great photo isn’t produced by a great camera. It’s produced by a great photographer. It takes instinct, timing, and confidence. And the good thing about all those traits is that they can be improved with practice. Anyone can take great pictures, as long as they just keep taking pictures until it feels right. Until they can automatically recognize a beautiful moment and get their shutter finger on the button quick enough. But that’s not the end of it. After you capture that great image, it takes a little bit of polishing to really bring out the true colors of the photo. If you’ve only been relying on photos directly out of the camera up until now, it’s time to take the next step: Post production.
I know it can be intimidating. There are so many programs to choose from. And when you finally make that choice, the interface of the software can be daunting to a beginner. But don’t give up yet! Once you master the art of editing, it can really bring your photography to the next level. Good pictures suddenly become striking images!
Personally, I use, and recommend, Adobe Lightroom. Don’t spring for Photoshop just yet (though if you’ve already mastered Lightroom and want to try out a professional program, the end of this article will address some tips on enhancing your images). Photoshop can literally do just about anything your mind can conceive. But it can also be very difficult, and very expensive. Lightroom is very user friendly once you get used to it, and is very reasonably priced as well. There are free programs out there too, if you’re wanting to get your feet wet before committing financially. For these purposes, I will be using Lightroom as my operating platform. If you’re using another program, you’ll have to adjust accordingly. But the principles will remain the same.
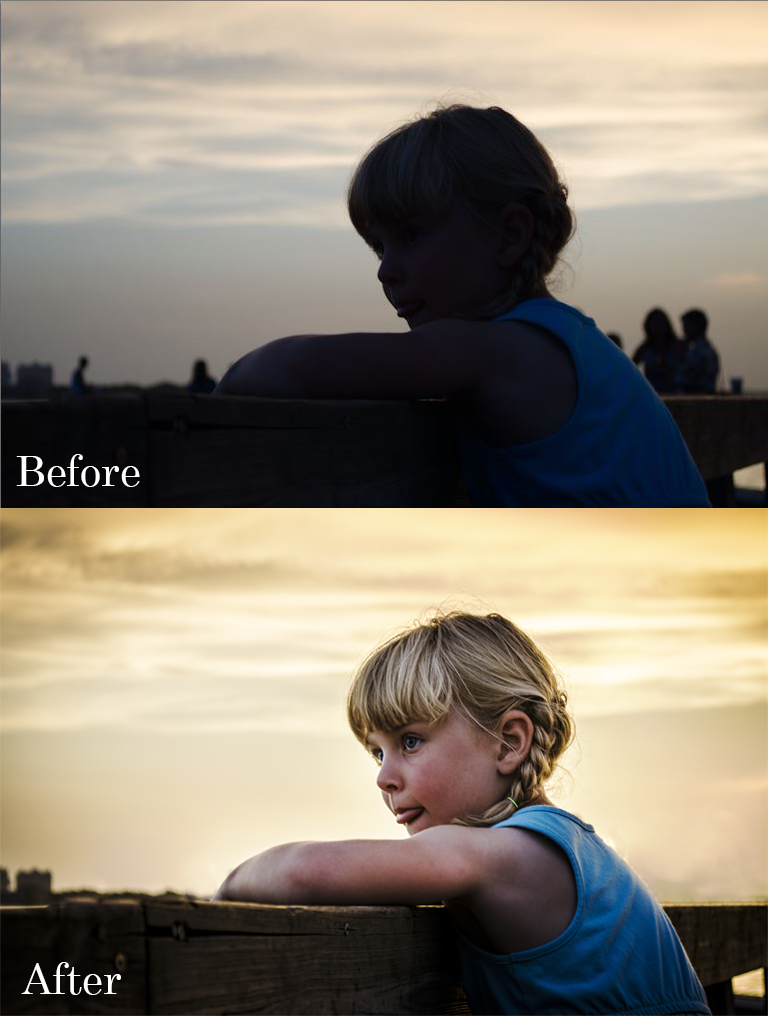
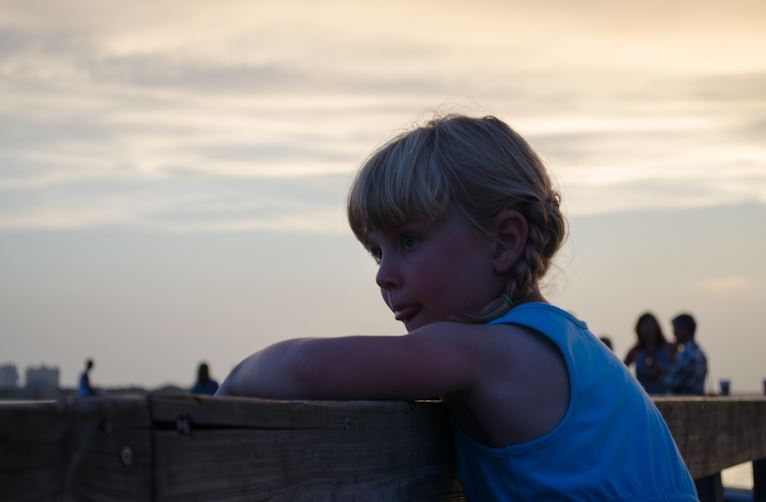
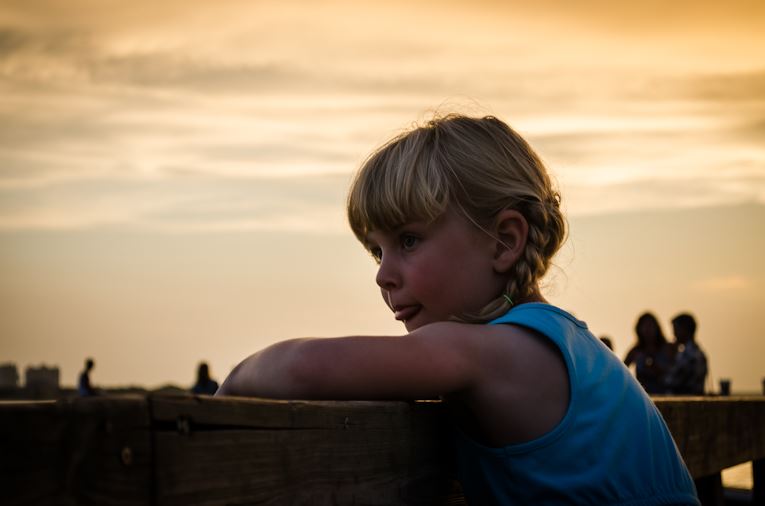
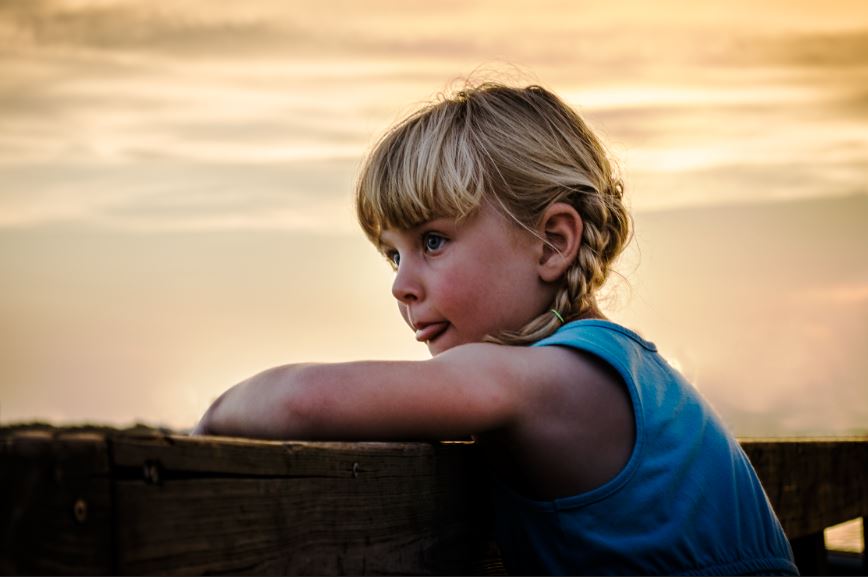
This summer I took the below picture:
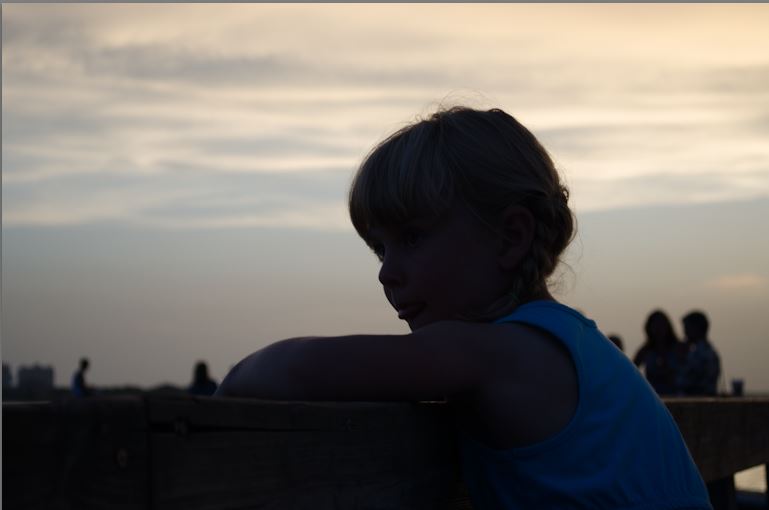
As you can tell, it was drastically underexposed. Generally, images won’t be this dark and unrecognizable. But I’m using an extreme example to illustrate the possibilities of post-production.
One note: If you’re shooting on a DSLR, I recommend shooting in the RAW format. It requires you to convert pictures to JPEG after uploading to your computer, and it takes up a lot more space per picture. But RAW captures so much more image information (most importantly, exposure and color settings). It makes it easier to resurrect images like the one above. Plus, JPEGs lose picture quality with each edit you make to it, whereas RAW doesn’t.
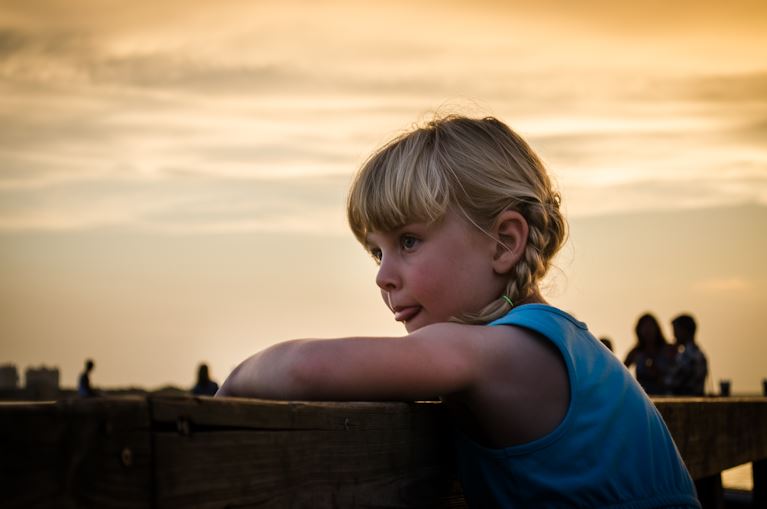
After uploading to Lightroom, the first thing I do with the image is increase the Exposure to 1.07.
After that, I increase the Shadow a little bit, to 21. I don’t want to increase it TOO much, because I plan on making further adjustments later on. Keeping a bit of the darkness will make the picture stand out, and give it nice contrast.
Next, I lower the Highlights all the way down to -74. When I increased the Exposure, that made the background sky a bit blown out. I want to be able to see those clouds.
Adjusting Contrast can make the dark spots more dark and the light spots more light. One way to increase underexposure would be to lower the contrast. In my experience though, that can make an image look flat. So, even though it makes the image a little bit darker (for now), I increase the contrast to 36.
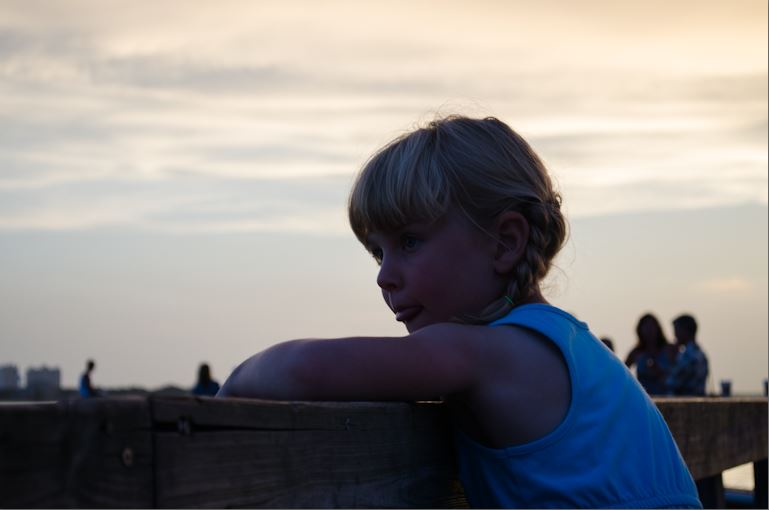
I up the Clarity to 38. Increased Clarity can make images look a bit harsher, while decreasing it can make it look soft. I generally like harder looking images than softer. It brings out some of the highlights in skin and hair, which can give the image some pop!

This image is particularly blue-tinted. The moment itself was during twilight, and the natural light was very golden and warm. The camera is just the device that captures the image. Sometimes it doesn’t get the atmosphere right. For this image, I increased the Temperature from 4100 to 5691.
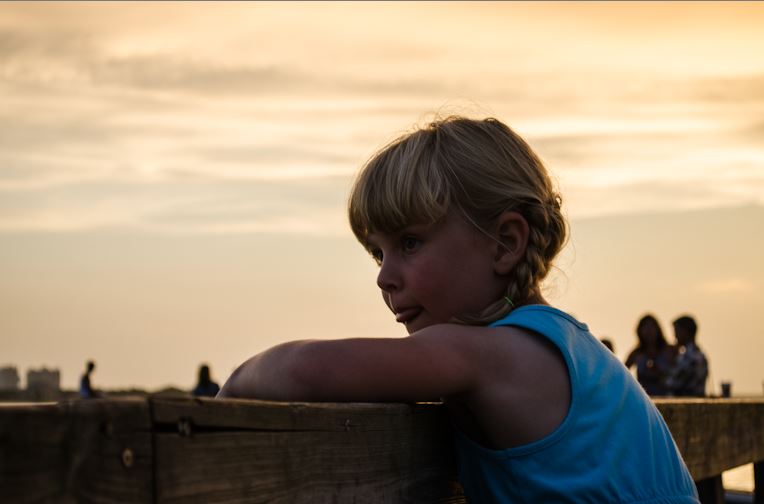
In Lightroom, you can use the Brush Tool to apply change to only specific parts of an image. I adjust just the shadow of face and arm of the subject (my niece Abigail), and brighten her up a bit. I still want to keep some of the image in darkness, to provide a pleasing contrast.

I initially decide to lower the Whites to -7 and the Blacks to -12. I will change these later, after I tinker with the image a little bit more. For now, I’m trying to make sure the image isn’t TOO bright, and that the darks are nice and deep.
I like sharper images. They tend to attract more attention and make the photo look a bit more “high quality.” I increase the Sharpening to 52 for this image. And since Sharpening a pic can cause some noise, I use Luminance Smoothing to make the image more…smooth. I increase to 19.

In portraits, I often like to add some Vignette to the edges of the photo. It gives it that studio quality. The vignette for this one is set at -19.
Now that I’ve made some more tweaks to the image, I go back and adjust the Brush Tool settings for the subject’s face and arms. I raise the Exposure to .25 and the Shadows to 29.
I also add a bit more Clarity to the image, to give it an even more striking look. I push it all the way up to 69.
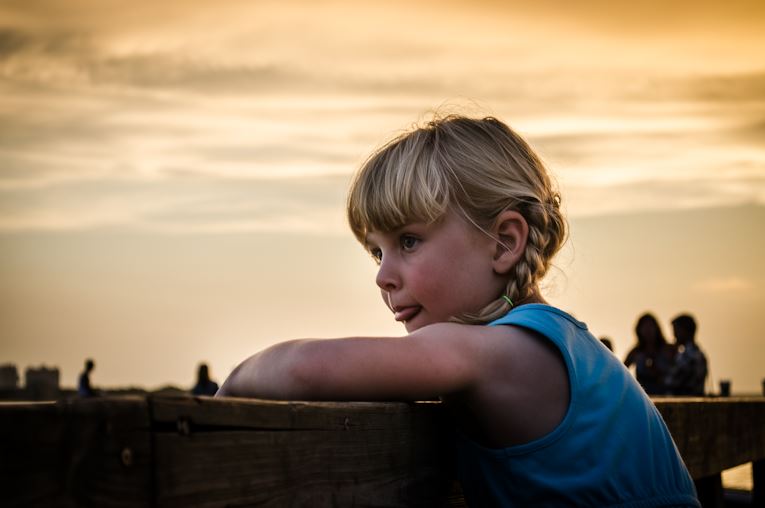
Whenever I have pictures of people, I like to enhance the pupils. I try to find a balance between increased Shadows, Clarity, and Exposure. The eyes should look a bit more detailed, and slightly lighter in color. For this particular image, the settings are: Exposure at .10, Shadows at 20, Clarity at 31. I also lower the temperature to make the eyes a little more blue. Note: this can only been done for subjects with blue eyes, obviously. For green or brown eyes, you wouldn’t adjust the temperature. You can, however, use tint with the Brush Tool, to make whatever color you desire.

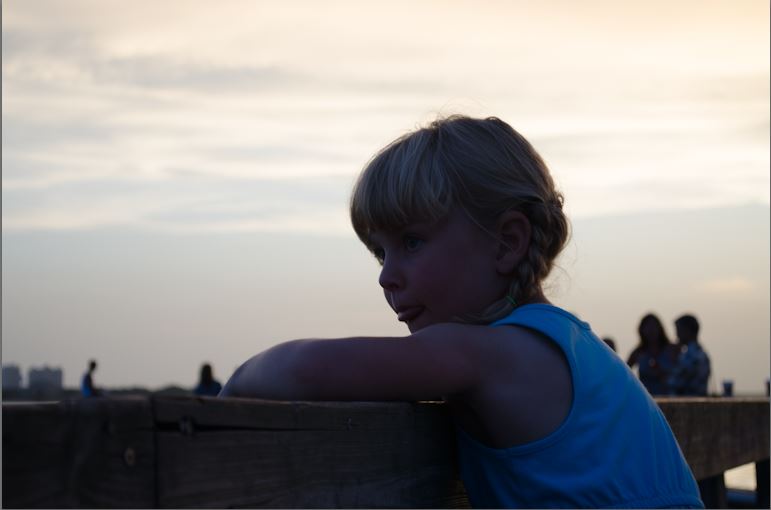
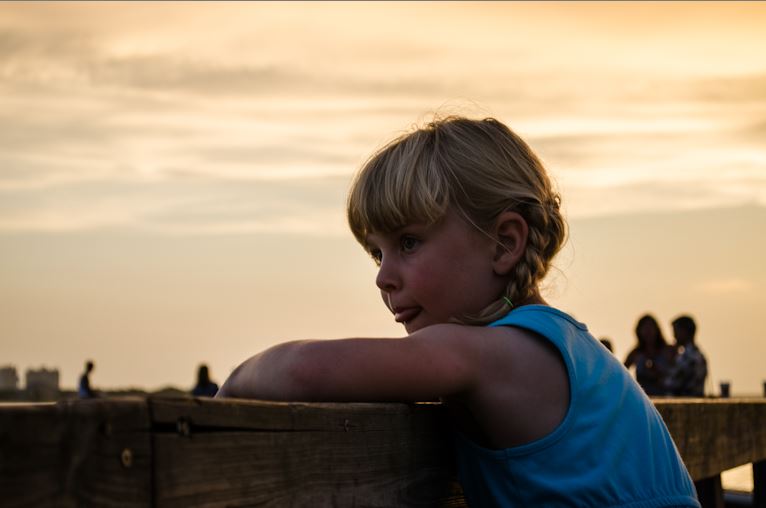
After making all these adjustments, the last thing I need to do in Lightroom is crop it to make it the most pleasing to the eye. If there is too much sky space, it can just feel off. So I center the subject a little bit. Though not PERFECTLY in the middle. For this type of portrait, you don’t want a perfectly centered image. It should be slightly off, and adhere to either the Rule of Thirds or the Golden Ratio (if you’re not familiar with these, go ahead and Google them – they are an important principle to keep in mind for any photographer).
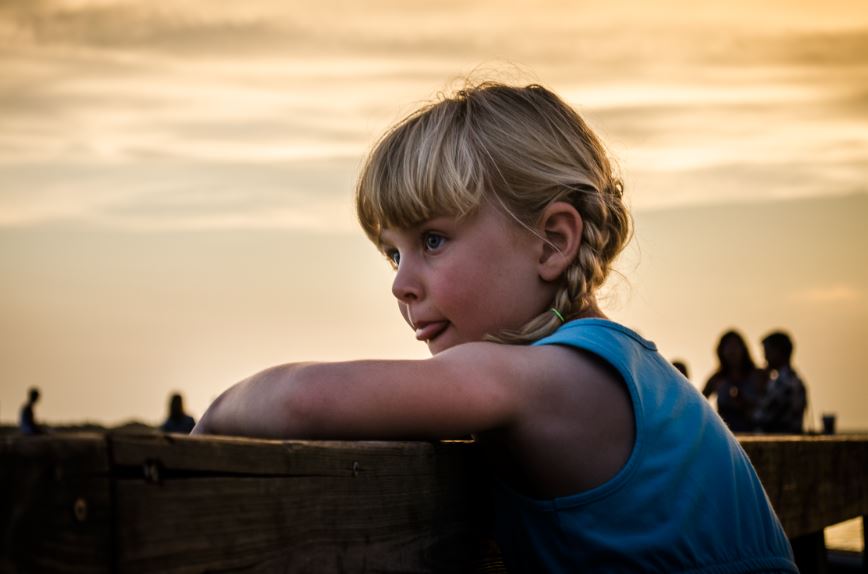
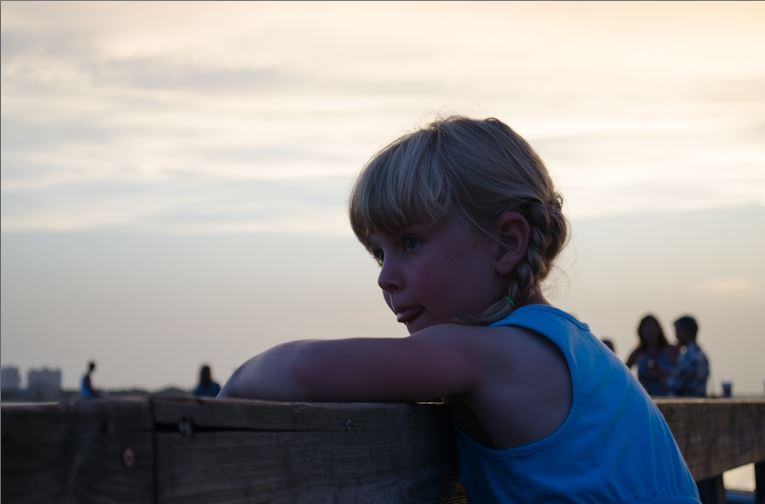
If you’re just working with Lightroom, or a comparable program, then you’re done for the day. You can use your picture on Facebook, or Flickr, or get it printed through Mpix. This image was particularly underexposed, so if you magnify it, you are bound to see some quality degradation. But most people won’t zoom in on an image. And for all intents and purposes, it will look perfectly normal to the eye.
If you’re comfortable with making changes like this, and want to add just a little bit extra to your image with Photoshop, here are a few more things you can do to improve that “ahhh” factor.
The first thing I do after importing the RAW file to Photoshop is to copy the image. I never make edits to the “Background” image. After copying the image, I use the Healing Brush Tool (not the Spot Healing Brush Tool) to get rid of the other people milling about in the background of the picture. I like the Healing Brush better than Spot Healing Brush because you have more control over the pixels the brush is pulling to make the correction.

After that, I sharpen the image a bit. There are numerous ways to sharpen in Photoshop (including the actual Sharpen Filter). But I use a method that calls for: copying the image twice, applying a Surface Blur on the first image, then using Apply Image for the second image (using the first image’s layer, along with a Subtraction “Blending” option). I set the second image’s blending to Vivid Light and then delete the first image. I also add another copy with high pass (Google/Youtube that if you’re not familiar). That’s a bit technical. You just have to mess around with things a bit and find what you like the best. There are tons of youtube videos out there on how to sharpen.

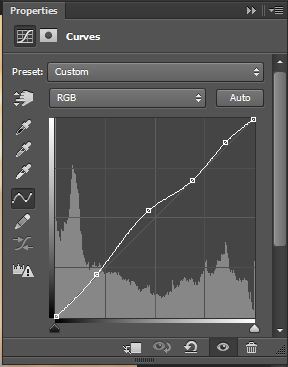
I apply a curves layer next, and bring out a bit of the skin and hair highlights. (I’ve include a snapshot of the Curves settings I used for this particular image). I also used a layer mask to make sure that the sky wasn’t affected by these changes (again, Youtube/Google masking techniques to find what you like best)
I also add a Brighten/Contrast layer and increase the Brightness to 16 and contrast to 9. I masked the sky out too, so that it only brightened the subject.

And voila. There you have it. The complete picture, with all adjustments. It’s clearly way different than the starting photograph. Whereas some people may have thrown the image away at first glance, I knew that it had potential. Using Lightroom and Photoshop, I was able to pull it out of the darkness (quite literally) and transform it into a usable photograph.
As I mentioned, not all pictures will be this far gone, and will require much less tweaking. But I think it’s good to see that almost anything is possible, as long as you have an open eye (photography pun not intended).
If you have any questions, or just want to show off an example of your own, feel free to email adam@adagat.com
Nice work! And I was able to follow along until you got to the PS section. 😉 Great tutorial.